So much for consistency! My goal was to write weekly, but I guess I’ve missed a few!
I think the block started when I started my last post, which was actually a lead-in to this post but I got bored with it and decided not to hit publish.
Here’s the summary:
I had 2 Oztent RV3’s, and while they were fast to setup, by the time you added the side panels to the awning – x’s 2 – and connected the two tents together, it was close to 45 minutes of setup time. Then after moving the cots and sleeping bags in and setting them up, getting the camp kitchen setup, and don’t forget all of this had to be unpacked and unloaded from the truck, setup was taking darn close to 2 hours. Do that after a day on the trail when you’re tired, and it’s pretty taxing.
Oh, and don’t forget it all has to be broke down the next morning since often times when “overlanding” you’re moving every day. Breakdown, reloading and repacking often took close to 2 hours as well.
So, that setup was about 4 hours of setup and breakdown every day and was enough for me to want to hang the towel after just one trip.
Doing something different wasn’t optional, I had to make a change.
The most time consuming parts
When I got home from my first trip, I went to work right away trying to deconstruct what was taking so much dang time.
The tent setup was a beast, but 1 RV3 wasn’t big enough for all of us. Two of them together was definitely too much, but we’d just spent over a grand on them so we had to figure something out. Bottom line is setting them up took 45 minutes with everything, then add about 10 minutes for unloading and setting up the cots and sleeping bags (I can’t sleep on the ground) and we’re close to an hour and haven’t even got dinner on yet.
Sleeping Setup Time: 55 minutes
The camp kitchen was far from efficient, but it was still pretty basic.
- Unload box with cooking supplies in it
- Unpack box, get stove out and setup
- Get propane cylinders out and hooked up
- Find utinsils
- Get food ready to prepare
- Cook
- Setup washing station
- Wash dishes
- Hang out to dry
- When done, pack all that crap back up again and get ready to leave
Seriously, between these two things, that was 95% of our time spent setting up and breaking down camp.
Camp Kitchen Setup Time: 30 minutes
Overlanding Trailers – Why a Kitchen is a MUST
I immediately realized the benefit of having a ready-made solution after that first trip. The first thought was just to have additional storage and a platform to mount a rooftop tent to. However the more I looked, the more I thought about it, the more I really liked the idea of having a kitchen as part of the solution.
I mean think about it, why do we have kitchens in our home and why are they laid out the way they are? Modern-day kitchens have evolved to what they are today because they’re functional.
If possible, it makes complete sense to have a full kitchen on the trail with you as well. Not only is your ability to prepare meals easier, but everything is neat and tidy, organized and easy to store and find later. And if everything tucks and slides away, then setup and breakdown can be kept to a minimum.
Overlanding Trailers – Sleeping Platform
There are really only two styles of off-road trailers available – ones that you sleep IN and ones that you sleep ON.
I’d loosely considered the teardrop style where you have a cabin, a bed, some interior storage, a platform on the top for a rooftop tent or additional storage, but I wasn’t finding anything that really appealed to me. Since I’ve made my purchase (more in a minute), some others have come on the market that are pretty slick (like this Cricket or stateside offerings of Patriot), but I still believe what I have is best for me.
I really preferred the flexibility of going with a rooftop tent instead of a platform that provided sleeping within a cabin. Although the idea of having a climate controlled space is pretty appealing.
When camping in ground tents, I just can’t sleep on the ground. The best option for me is sleeping on one of those sling-back cots. While somewhat comfortable, they’re time consuming to setup (remember, we were setting up 3-4 depending on how many kids were with us), heavy to travel with and you still had to unpack your sleeping back.
With a rooftop tent, you completely eliminate the time it takes to setup the cots and unpack sleeping bags, and more importantly, you dramatically cut the amount of time it takes to setup the shelter.
Plus, they come with a 3-4″ foam mattress. This isn’t as nice as your bed, of course, but it’s way better than those heavy cots or sleeping on the ground, way better.
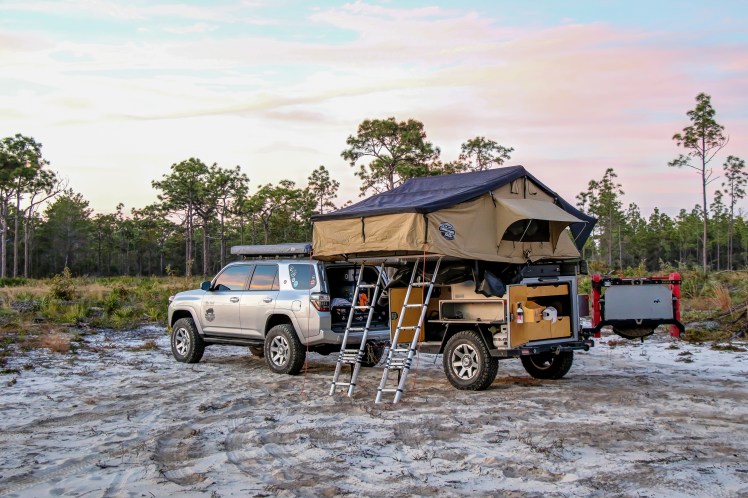
Enter my Turtleback Trailer
This was a tough decision. When I first started going through this thought process, I had absolutely not considered spending the kind of money the Turtleback Trailer cost. I was thinking $3-5k, maybe $7k for the right platform. But that just didn’t exist. Any option I found that had integrated storage, kitchen, rooftop tent, water, plumbing, etc. that was anywhere close to that price range was not good enough quality to expect it to hold up off-road. And the more I learned about it all, the more complicated I realized it was, which of course, meant more money.
My plan was to watch the used trailer forums on Expedition Portal for a while and just research from there, based on what comes available. I’d heard about the Turtleback Trailer and had considered it to be one of the best options out there, which to me, equated to being more costly and ultimately not possible for me. But I couldn’t shake concept of how convenient a ready-made solution like that would be. I mean, it would be a dream come true right?
When the one I currently have came online, I shot a link to my banker and asked if it were possible to get a loan for something like that (I don’t have $20k laying around) and he said sure. So I figured what the heck, let’s do it. I contacted the seller and arranged the deal (of course I researched the trailer history a bit before I signed over the check).
Why this Setup is the Best
90% of the time, on our trips, we move every day. That means we setup and breakdown camp every single day.
With our Turtleback Trailer, we can roll into camp and be completely setup with dinner on in 30 minutes. That’s a far cry from the darn near 2 hours it took before. And the best part is I don’t feel burnt out every day.
I recently timed myself setting up my CVT Mt. Denali Summit Series rooftop tent, and I clocked myself at 9 minutes 23 seconds. And that was everything, taking off the cover, unfolding the tent and mattress, setting up the sleeping bags and deploying all the awning poles.
That means I can literally pull into camp and hit the sack in less than 10 minutes. That is a huge improvement over the 55 minutes it was taking us before.
On the Turtleback Trailer, the kitchen is accessible by opening the rear swing arm, then the door, then you just slide the kitchen out. The stove and sink are right there ready to perform your every desire. Getting dinner on takes minutes.
And when you’re ready to do your dishes, I just have a scrub thingy from Walmart and some dish soap and wash them right there at the sink, setting them in a drying tray thing before I put them back in the drawer under the sink.
Electrical, Plumbing, Water oh My!
So we’ve talked about sleeping and cooking, but there are a variety of other little things that really add some icing to this overland camping cake.
Other creature comforts that make our trips more comfortable is a 42 gallon water storage tank (plumbed to the sink and shower), water heater (also plumbed to the sink and shower), plumbed propane to the water heater and stove, 2 group 31 AGM deep cycle marine batteries, solar charge controller, 1000 watt inverter, Foxwing 270 degree awning, LED lighting on all four sides, trailer braking system and probably tons of other things baked in I’m not even thinking of.
Plus it’s rugged and tough and capable of handling the abuse you’ll put it through when traversing off-pavement trails.
I didn’t intend for this to be a promotion of my Turtleback Trailer, but it’s what I have and I love it. Adding a trailer to your overland arsenal is a big step and will likely be costly. But if you’ll use it, it will make your trips run so much smoother. Overlanding with a trailer has allowed me to focus on what’s most important on my trips, spending time with my family, exploring and finding adventure.
